Enabling USB Keyboard Power On (Dell Optiplex)
This tutorial (Also available as a video guide) will walk you through the steps to configure your Dell Optiplex to power on from a complete shutdown (powered off) using your USB keyboard. This is useful if your computer is in a hard-to-reach location.
Identify the correct USB port
Locate the USB port on the back of your Optiplex that has a power symbol next to it. This is the “Smart Power On Connector Port.” Ensure your USB keyboard is plugged into this specific port.
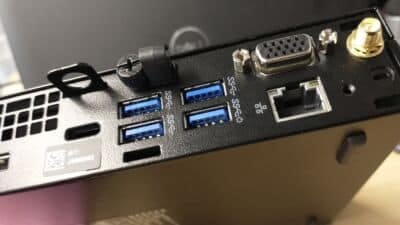
Locate the Dell PC Smart Power On Connector
Access the BIOS
- Completely shut down your Optiplex.
- Power on the computer.
- Immediately and repeatedly press the “F2” key on your keyboard until the BIOS setup screen appears.
Configure Power Management
- Use the arrow keys or mouse to navigate to the “Power Management” section.
- Locate the “Deep Sleep Control” option.
- Change the “Deep Sleep Control” setting from “Enabled” to “Disabled.”
Save and Exit BIOS
- Click ‘Apply’ to apply the changes you made.
- If prompted, save the settings as a Custom User setting to ensure they persist through BIOS updates.
- Exit the BIOS setup.
Perform a Full Shutdown in Windows
- Once Windows has loaded, perform a complete shutdown by clicking the Start button and selecting “Shutdown.” Wait for the computer to fully power off.
Test USB Power On
- With the computer powered off, press the Enter key on your USB keyboard. If you followed these steps correctly, your Dell PC should power on!
Important Notes:
- The USB keyboard must be connected to the designated “Smart Power-On Connector Port.”
- Saving the changes as a custom user setting in the BIOS is recommended to prevent them from being lost during BIOS updates.
- This method is for a complete power-off S5 state, not just a sleep or hibernate (S3 / S4) state.
If you’re looking for computer support in Sittingbourne, we would be happy to help. Get in touch so we can give you a quote!


